Guide
Guide
Contents
|
General Icons Control Keys Control Center Context Menu |
Elements Add more anchors Add containers Change Containers Change Elements Add / Edit Data |
Page Add Page Edit Page Delete Page Sort Pages Hierarchy Modify Pages Hierarchy |
Templates Change Template Administration Website, template |
General
Icons
 Add More Anchor icon. To add more Anchor points.
 Anchor icon. Anchors marks a position where Containers can be attached.
 Container icon. Normally hidden, can be made visible through Admin Section.
 Change Element. Elements deicide the data display process.
 Data icon. Data can be Rich Text Editor, Image, Navigation etc.
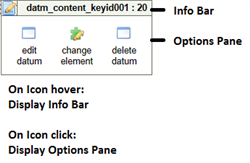
Control Keys
Edit Key: "/e" key is used to edit a page content. Append this key to the page URL. Example, to edit the page content on http://demo.gingercms.com/features use the edit key like http://demo.gingercms.com/features/e
Refresh Key: "/r" is the refresh key, use this key to invalidate the current cache so that latest data can be re-cached on the subsequent request. To refresh a page use this key at the end of the URL like http://demo.gingercms.com/features/r
Remove Edit: "/x" can be used to remove the edit option to see the modifications. To refresh a page use this key at the end of the URL like http://demo.gingercms.com/features/x
Combination Keys: You can use the above keys in combination as an example http://demo.gingercms.com/features/e/r to edit and refresh the cache at the same time.
Control Center
 The control center is used to add amd modify pages, manage navigation hierarchy, handle templates and force visible containers. The contol center section is visible on the top right side in the edit bar. Right click on the "Control Center" word or link to slide open Page, Template and Others tabs.
Context Menu
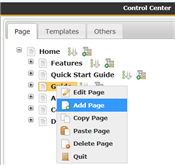 The Context Menu can be invoked from the pages tab of the Control Center. Right click on the a page node to display the context menu. The context menu provides the user with the following options Edit Page, Add Page, Copy Page, Paster Page, Delete Page and Quit.
Elements
Add More Anchors
Add more achors can be used to add new anchor points (anchors). When you hover over the "Add more anchors", you will see a right help bar pop up giving information about the icon. Right click on the "Add more anchors" to toggle the options of add anchors. Click on the "add anchor" icon to add an anchor point.
Add Containers
An anchor is a place holder for containers. Containers come in various flavors like box, 2 column and 3 column (tabs, tables, accordions slated to be released in bext version). Right click on the "Anchor Icon" to get the option window, select "add container" link to take you to a add container pop-up, select the appropriate container and add it to the anchor point.
Change Containers
Containers icons are normally visible on the page edit. To change a container, the user need to enable the container visibility from the Contorl Center - Others tab. Check the "show Containers" check box to display the containers. Click on the container icon to change the container.
Change Elements
An Element defines the combination of data to display. Standard Elements comes in the flavor like RTE (Rich Text Editor), Images, Text around Image, etc. Custom Elements will be introduced in the next version.
Add / Edit Data
Click on this icon to add or edit data.
Page
Add Page
A new page can be added from the Control Center.
Edit Page
To edit a page meta data, add new or remove new CSS, JavaScript files use the Control Center option. Navigate to the page click on the page name to open the context menu and select the edit page option.
Delete Page
An existing page can be deleted by selecting the page delete option from the context menu. This action ensures that a page is deleted from the system. Once a page is deleted the data associated with the page is also deleted, the deleted data cannot be retrieved.
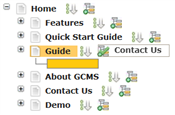
Sort Pages Hierarchy
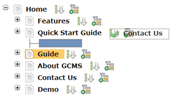 Select a page node and Drag the page icon to the destination page. Hover the mouse ove the Sort icon (3 circles with the down arrow), the sort position will be highlighted as a blue box, release the mouse to drop the page to the new sort position.
Modify Pages Hierarchy
 Select a page node and Drag the page icon to the destination page. Hover the mouse ove the Page Add icon (pages hierarchy), the addposition will be highlighted as a yellow box, release the mouse to drop the page to the new add position.
Please note that once a page is deleted or a page is added or the hierarchy/sort order is changed, you have to publish the navigation again at the template level to see the changes.
Template
Change Template
Template can be applied to a page from the "edit page" option of the context menu. The current template is visible in the template preview section. To change the template select a new template from the template gallery to apply the template to the page.
Administration
Websites, Templates
Most of the admin work can be performed through the "edit option" and "control center". The back-end admin to manage the web site creation, templates creation and modification can be accessed from the URL http://websiteurl.com/admin/login.aspx. To access the demo ginger cms admin section, you can navigate to http://demo.gingercms.com/admin/login.aspx